Blog

Your blog category

yard with standing water drainage problems
Blog

Best Yard Drainage Solutions for Homes With Standing Water

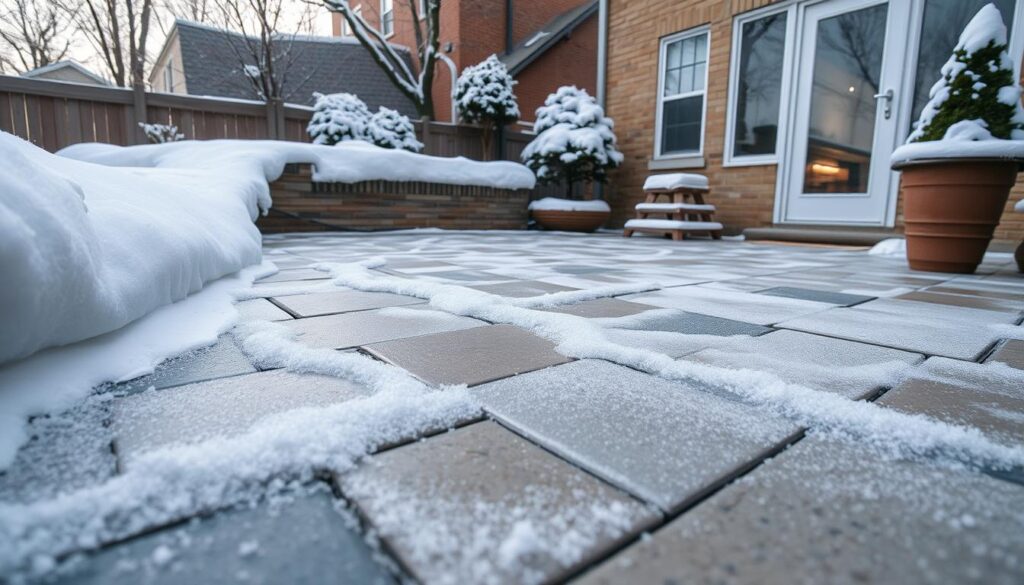
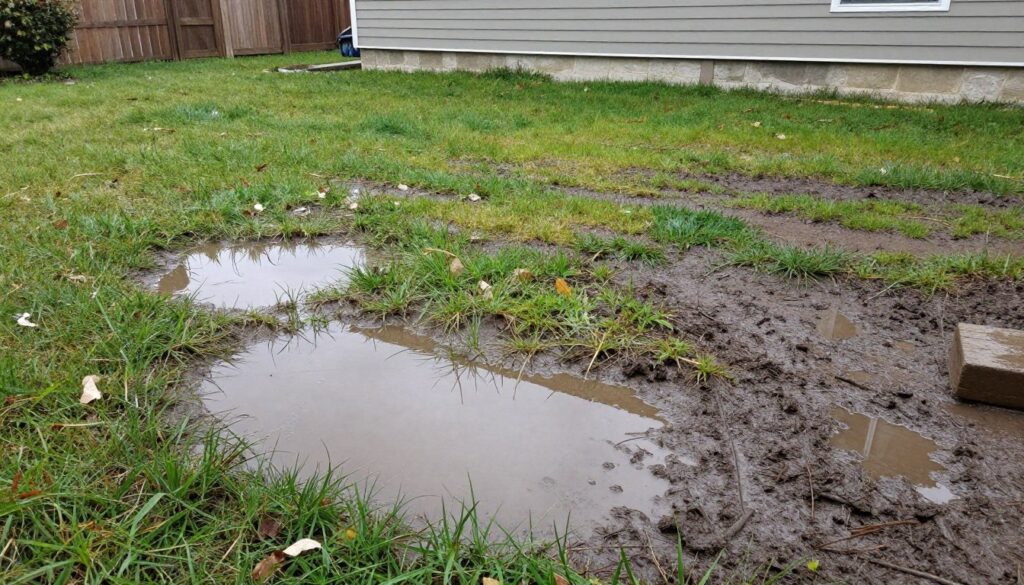
Standing water in your yard creates serious problems for any home. Pools of water damage grass and plants while attracting mosquitoes and pests. The moisture threatens your foundation and creates unusable outdoor spaces. Many homeowners face this frustrating drainage issue after heavy rain or snow melt. Your property deserves effective yard drainage solutions that protect your landscape and home. This comprehensive guide explores proven methods to eliminate standing water. You will learn about different drainage systems and how to choose the right solution for your specific situation. Professional Insight: While many drainage problems can be resolved with DIY approaches, complex issues involving foundation protection or extensive water management may benefit from professional drainage assessment and installation services. Understanding Your Yard Drainage Issues Before selecting yard drainage solutions, you need to identify the source of water problems in your landscape. Standing water appears for several reasons. Poor soil composition prevents proper absorption. Incorrect grading directs runoff toward your house instead of away from it. Heavy clay soil retains water longer than sandy or loamy soil types. Compacted earth from construction or heavy foot traffic reduces drainage capacity. Low spots in your yard naturally collect water and create persistent wet areas. Understanding these factors helps you select appropriate drainage solutions for your property. Signs You Need Better Yard Drainage Water pools in the same spots after every rain event Grass dies in wet areas or moss replaces healthy lawn Basement or crawl space shows moisture or water intrusion Foundation cracks appear or worsen over time Soil stays soggy for days after rainfall stops Erosion channels form across your landscape How to Assess Your Property Walk your yard during and after rainfall to observe water movement. Note where puddles form and how long they persist. Check the slope around your foundation. The ground should slope away from your house at least six inches over ten feet of distance. Examine your downspouts and gutters. Make sure they direct water at least five feet away from your foundation. Inspect low areas where water naturally collects. Take photos to document problem spots during wet conditions. French Drain Systems for Yard Drainage French drains rank among the most effective yard drainage solutions for persistent water problems. This system uses a gravel-filled trench with a perforated pipe to redirect water away from problem areas. Water flows into the trench and through the pipe to a safe drainage point. How French Drains Work A typical French drain system consists of several components working together. You dig a trench that slopes gradually toward the drainage outlet. The trench depth ranges from 18 to 24 inches depending on your drainage needs. You line the trench with landscape fabric to prevent soil from clogging the system. Next, you add a layer of gravel and place a perforated drain pipe on top. The pipe has small holes that allow water to enter. More gravel covers the pipe completely. The fabric wraps over the gravel layer before you backfill with soil. French Drain Advantages Handles large volumes of water effectively Works well for multiple drainage problems Lasts for many years with proper installation Can be combined with other drainage solutions Prevents foundation damage from excess moisture French Drain Disadvantages Requires significant excavation work Installation costs more than surface solutions May need professional installation for best results Can become clogged without proper fabric protection Difficult to repair once installed Installation and Cost Considerations DIY French drain installation costs between three and seven dollars per linear foot for materials. You need gravel, perforated pipe, landscape fabric, and basic digging tools. Professional installation ranges from twenty to fifty dollars per foot depending on depth and soil conditions. The project requires physical labor and careful planning. You must determine the correct slope for water flow. Most systems need at least one inch of drop per eight feet of length. Make sure you have a suitable outlet point for the collected water. Surface Drains and Channel Systems Surface drains capture water before it soaks into the ground. These yard drainage solutions work well for areas with heavy runoff or poor soil drainage. The system includes grated inlets connected to underground pipes that carry water away from your property. Types of Surface Drainage Systems Catch basins feature a large grated opening that collects water from surrounding areas. The basin sits below ground level and connects to drainage pipes. You install catch basins in low spots where water naturally flows. Channel drains use long, narrow grates that span wider areas. These work perfectly for driveways, patios, and walkways. The channel directs water to a single outlet point or connects to your main drainage system. Where to Install Surface Drains At the base of downspouts to prevent water pooling In low spots where puddles consistently form Along driveways and sidewalks to prevent runoff Near garage doors and basement entrances Under deck areas prone to standing water Surface drains cost less to install than French drains. Basic catch basins range from fifty to two hundred dollars each. Channel drain systems cost between fifteen and thirty dollars per linear foot for materials. Dry Wells and Rain Gardens Dry Well Installation Dry wells provide underground storage for excess water drainage. You dig a large hole and fill it with gravel or install a prefabricated dry well container. Water collects in the well and slowly percolates into surrounding soil over time. This drainage solution works best in areas with naturally permeable soil. Sandy or loamy soil allows water to drain faster than heavy clay. The typical dry well measures three to four feet in diameter and four to six feet deep. You connect downspouts or French drains to the dry well through underground pipes. The system handles large volumes of runoff during storms. The water gradually disperses into the ground instead of pooling in your yard. Dry Well Benefits Reduces runoff to storm drains and streams Recharges groundwater naturally Handles large water volumes efficiently Invisible once installed in your landscape Installation Requirements Place dry wells

Fall Yard Cleanup
Blog

Fall Yard Cleanup Checklist: 10 Things to Do Before the First Freeze

The window between the end of summer and the first hard freeze goes fast — especially in the Chicago area. If you wait too long to prep your yard for winter, you could be setting yourself up for a patchy lawn, damaged plants, and a sluggish start next spring. Use this fall cleanup checklist to make sure you cover everything before the cold sets in. 1. Rake and Remove All Leaves This is the big one. A thick layer of leaves left on your lawn over winter blocks sunlight, traps moisture, and creates ideal conditions for fungal disease. Don’t let them sit — rake thoroughly and bag or compost them. If you have large trees and a big property, consider hiring a professional crew to handle it efficiently. 2. Mow at the Right Height for Winter For the final mow of the season, cut your cool-season grass (bluegrass, fescue, ryegrass) to about 2.5–3 inches. Too short and the crown of the grass is exposed to freeze damage. Too long and the grass can mat down under snow, promoting snow mold. Get this right and your lawn will come out of winter in much better shape. 3. Aerate Compacted Soil Fall is actually the best time to aerate cool-season lawns. After a summer of foot traffic and heat stress, soil is often compacted. Core aeration opens the lawn up so winter precipitation and spring treatments can penetrate deeply. Do this in early fall while the grass still has several weeks to recover before dormancy. 4. Overseed Thin Areas Pair aeration with overseeding for maximum effect. Early fall is ideal — soil is still warm enough for germination, but cooling temps reduce the stress on new seedlings. Fill in thin spots and bare patches now so you start next year with a full, dense lawn. 5. Apply a Fall Fertilizer A fall fertilizer application — often called “winterizer” — feeds your lawn’s root system through late fall, helping the grass store energy for a strong spring green-up. Use a slow-release formula and apply it before the first frost when the grass is still actively growing but top growth has slowed. 6. Cut Back Perennials and Ornamental Grasses Most perennials should be cut back in fall to reduce pest habitat and tidy up beds. However, some — like coneflower and black-eyed Susan — provide winter interest and bird food if left standing. Ornamental grasses are best cut back in early spring, not fall. Know what’s in your beds before you cut everything down. 7. Clean Out and Prep Garden Beds Remove dead annuals, pull any remaining weeds, and top beds with a fresh layer of mulch (2–3 inches). Mulch insulates plant roots from freeze-thaw cycles and reduces winter soil erosion. Don’t pile mulch against plant stems or tree trunks — leave a small gap to prevent rot. 8. Drain and Store Irrigation Equipment Any water left in irrigation lines, hoses, or outdoor spigots can freeze, expand, and cause serious damage. Blow out your irrigation system before the first hard freeze, disconnect and store garden hoses, and shut off outdoor water supply valves. This is a quick step that prevents expensive repairs. 9. Clean Your Gutters Wait until most of the leaves have fallen, then clean your gutters thoroughly. Clogged gutters can’t move water away from your home during fall rains — and in winter, they can cause ice dams that back water up under your roofing. This is one of the most overlooked fall tasks, and one of the most important. 10. Assess Your Drainage Fall is a great time to take stock of any drainage issues in your yard. Did certain areas stay wet all summer? Did you notice basement moisture after heavy rains? Identifying these problems in fall gives you time to plan a solution before spring — when drainage issues are typically at their worst. Need Help Checking These Off Your List? Fall cleanup season is busy, and it’s easy for these tasks to pile up until it’s too late. AN Outdoor Services provides comprehensive fall yard cleanup for homeowners throughout the Chicago suburbs — from full leaf removal and final mowing to bed cleanup, gutter clearing, and drainage assessments. Contact us today to schedule your fall cleanup before the season ends.

Blog

How Long Does a French Drain Last? (And How to Make It Last Longer)

If you’re considering a French drain installation, one of the first questions you probably have is: how long will it actually last? It’s a fair question — drainage work requires excavation, materials, and professional labor, so you want to know it’s a long-term investment, not a temporary fix. The short answer: a properly installed French drain can last 30 to 40 years or more. But like most things in your home, longevity depends heavily on the quality of installation and how well you maintain it over time. Here’s what you need to know. What Determines How Long a French Drain Lasts? Installation Quality The single biggest factor in French drain longevity is how well it was installed. Key variables include: Proper slope: The trench must be graded at the right angle (typically 1% or more) so water flows by gravity. A flat or improperly sloped drain won’t move water efficiently and will fail sooner. Filter fabric: Perforated pipe should always be wrapped in filter fabric (geotextile cloth) to prevent soil and fine particles from entering the pipe and clogging it over time. Clean aggregate: The gravel surrounding the pipe should be clean, washed stone — not dirt-mixed fill material that will compact and restrict water flow. Correct pipe size: Undersized pipe won’t handle heavy rain events and can back up. Soil Conditions Heavy clay soils — common throughout the Chicago suburbs — can cause filter fabric to clog faster than sandy or loamy soils, because fine clay particles are constantly being carried by water movement. This is why high-quality filter fabric and proper installation are especially important in Illinois. Root Intrusion Tree roots are one of the most common causes of French drain failure. Roots naturally seek out water sources and can infiltrate perforated pipe over time, eventually blocking flow or crushing the pipe. Installing drains away from large trees — or using root-resistant pipe — can significantly extend system life. Maintenance A French drain that’s never inspected or maintained will fail sooner than one that gets occasional attention. Sediment builds up over time, and outlet points can become blocked by vegetation or debris. Signs Your French Drain May Need Attention Even a well-installed French drain can develop issues over time. Watch for these warning signs: Water is pooling again in areas the drain previously handled The outlet pipe has little or no flow during or after rain Soggy spots are developing in the lawn above where the drain runs The discharge area is dry even after heavy precipitation If you notice any of these, it’s time to have the system inspected. In many cases, a clogged drain can be flushed or partially replaced rather than fully reinstalled — saving significant cost. How to Extend the Life of Your French Drain Inspect the outlet annually. Make sure the discharge point is clear of debris, vegetation, and sediment buildup. This simple check takes minutes and keeps the system functioning properly. Keep trees away from the drain path. If you’re planting new trees or shrubs, avoid placing them directly above or adjacent to your French drain line. Watch for surface changes. Landscaping changes, new construction, or changes in grading near the drain can affect how water enters the system. Flush the system if needed. If flow is sluggish, a professional can run a high-pressure flush through the pipe to clear sediment accumulation. Is a French Drain Worth the Investment? Absolutely. When you consider that a properly installed French drain can protect your foundation, lawn, and landscaping for decades — and that foundation repairs or basement waterproofing can cost tens of thousands of dollars — a French drain is one of the most cost-effective investments you can make in your home’s long-term health. Get a Professional French Drain Installed Right the First Time The best way to ensure your French drain lasts as long as possible is to have it installed correctly from the start. AN Outdoor Services has extensive experience designing and installing French drain systems throughout the Chicago suburbs. We use quality materials, proper technique, and take the time to do the job right — so you’re not dealing with the same problem again in a few years. Contact us today for a free on-site drainage evaluation and estimate.

Blog

Spring Lawn Care Tips for Chicago Suburb Homeowners

After months of freezing temps, ice, and snow, your lawn is ready for a comeback — but it needs a little help. Spring lawn care in the Chicago area isn’t just about mowing when the grass starts growing again. A few targeted steps early in the season can mean the difference between a lush, healthy lawn all summer and a patchy yard you’re playing catch-up with until fall. Here’s what Chicagoland homeowners should do every spring to get their lawns off to the best possible start. 1. Wait Until the Ground is Dry Before Walking on Your Lawn One of the biggest mistakes homeowners make is rushing onto the lawn too soon after snowmelt. Wet soil compacts easily under foot traffic and lawn equipment. Give the ground a few days to dry out before you start any cleanup or mowing. A simple test: grab a handful of soil — if it crumbles, you’re good to go. If it holds a shape like clay, wait a bit longer. 2. Do a Thorough Spring Cleanup Before anything else, clear your lawn and beds of: Matted leaves and debris that settled over winter Dead branches and sticks blown down in storms Remnants of last year’s annual plants Any trash or debris that blew in over winter Matted leaves are particularly problematic — they block sunlight and trap moisture, which can cause mold and bare patches. If you have a lot of tree coverage, this is worth hiring a professional crew for. 3. Dethatch If Needed Thatch is the layer of dead grass stems and roots that builds up between the soil and the living grass. A thin layer (under half an inch) is actually beneficial — it acts like mulch. But a thick thatch layer blocks water, air, and nutrients from reaching the roots, leading to a weak, stressed lawn. If your thatch layer is more than half an inch thick, dethatch in early spring before the lawn starts actively growing. This can be done with a dethatching rake for small areas or a power dethatcher for larger lawns. 4. Aerate Compacted Soil Compacted soil is a common problem in Illinois, especially in high-traffic yards or those with heavy clay. Aeration — pulling small plugs of soil from the lawn — opens it up so water, air, and fertilizer can penetrate. Early spring or early fall are the best times to aerate cool-season grasses like Kentucky bluegrass and fescue, which are common in the Chicago area. 5. Overseed Thin or Bare Spots Winter often leaves lawns with thin patches or bare spots. Overseeding in early spring helps fill those gaps before weeds move in. For best results: Rake bare spots lightly to loosen the soil surface Apply seed appropriate for your sun/shade conditions Keep seeded areas consistently moist for 2–3 weeks 6. Apply a Slow-Release Fertilizer Cool-season grasses benefit from a spring fertilizer application once they start actively growing — typically when daytime temps are consistently above 50°F. Choose a slow-release nitrogen fertilizer to feed the lawn steadily without pushing excessive top growth. Avoid fertilizing too early; feeding a lawn that’s still dormant wastes product and can burn emerging grass. 7. Check Your Irrigation and Drainage Spring is a great time to inspect your irrigation system for broken heads and check that your yard is draining properly after snowmelt. If you notice areas where water is pooling or soil that stays wet long after rain, it may be time to address your drainage with a French drain or catch basin before the heavy summer rains arrive. 8. Edge Your Beds and Borders Clean edges instantly make a lawn look more polished. Re-cut the edges along your driveway, sidewalk, and garden beds in early spring to define clean lines that will hold through the season. Fresh mulch in the beds after edging ties the whole look together. Get a Head Start With Professional Spring Cleanup If your spring to-do list feels overwhelming, AN Outdoor Services can handle the heavy lifting. Our spring cleanup crews work throughout the Chicago suburbs — clearing debris, dethatching, edging beds, and refreshing mulch so your lawn is ready to thrive without you spending your weekends doing it. Contact AN Outdoor Services for a free spring cleanup estimate in your area.

Drainage
Blog

How to Tell If Your Yard Has a Drainage Problem (And What to Do About It)

Most homeowners don’t think about yard drainage — until it’s too late. By the time water is seeping into your basement or your lawn looks like a swamp after every rainstorm, the damage may already be underway. The good news: drainage problems show clear warning signs. Knowing what to look for can help you act early and avoid costly repairs down the road. 5 Signs Your Yard Has a Drainage Problem 1. Standing Water After Rain If puddles in your yard linger for more than 24–48 hours after a rainstorm, that’s a red flag. Healthy soil absorbs water relatively quickly. When water sits for days, it usually means your soil is compacted, saturated, or your yard lacks adequate slope for runoff to move away naturally. 2. Basement or Crawl Space Moisture Water stains on basement walls, musty odors, or visible moisture along the floor are often signs that groundwater is migrating toward your foundation. This happens when water saturates the soil around your home and finds its way through cracks or porous concrete. Left unchecked, it can lead to mold, structural damage, and expensive remediation. 3. Soggy or Spongy Lawn Sections If certain areas of your lawn feel soft or squishy underfoot — even days after rain — the soil in those spots is consistently oversaturated. This kills grass roots over time, leaving you with bare, muddy patches that are difficult to grow anything in. 4. Erosion and Mulch Washout Notice bare soil where mulch used to be? Or channels cut into your lawn from water runoff? Erosion is a clear sign that water is moving too fast across your property — and carrying your topsoil and landscaping with it. Erosion can worsen over time, exposing roots and destabilizing garden beds. 5. Water Pooling Near Your Foundation Water that consistently collects along your home’s foundation is one of the most serious warning signs. Even if it hasn’t entered the basement yet, chronically wet soil against your foundation exerts hydrostatic pressure on the walls — which can eventually cause cracking and leaking. What Causes Poor Yard Drainage? Several factors can contribute to drainage problems, especially in the Chicago suburbs: Clay soil: Illinois is notorious for heavy clay soil, which drains slowly and holds water near the surface. Flat grading: Yards without a proper slope toward the street or a drainage outlet have nowhere to send water. Compacted soil: Heavy foot traffic, construction, or years of wear can compact soil so much that water can’t penetrate it. Improper downspout placement: Downspouts that discharge water near the foundation or in low spots can create chronic wet areas. Lack of drainage infrastructure: Older homes may have been built without adequate drainage systems in place. What Can You Do About It? The right solution depends on where the water is coming from and how severe the problem is. Common drainage fixes include: French drains: Subsurface perforated pipe systems that collect groundwater and redirect it away from problem areas. One of the most effective long-term solutions for wet yards and foundation drainage. Catch basins: Surface inlets that capture standing water and channel it underground — ideal for low spots in the yard or near driveways. Regrading: Reshaping the ground so water naturally flows away from your home. Downspout extensions and dry wells: Simple fixes to redirect roof runoff further from the foundation. Don’t Wait — Drainage Problems Get Worse Over Time A small drainage issue today can become a major foundation or mold problem in a few years. If you’ve noticed any of the signs above, the smartest move is to get a professional assessment sooner rather than later. AN Outdoor Services provides free drainage evaluations for homeowners across the Chicago suburbs. We’ll walk your property, identify the source of the problem, and recommend the most cost-effective solution — with no pressure and no obligation. Contact us today to schedule your free yard drainage assessment.

Chicago winter scene showing snow-covered patio with ice formations demonstrating freeze-thaw challenges
Blog

5 Best Patio Materials for Chicago Weather: Durable Options for Your Outdoor Space

Chicago’s weather is notorious for testing the limits of outdoor materials. From bone-chilling winters with heavy snowfall to humid summers with scorching temperatures, your patio needs to withstand it all. The freeze-thaw cycles, salt exposure, and moisture fluctuations make choosing the right patio material crucial for longevity and performance.As a homeowner in the Windy City, you need materials that can handle these extreme conditions without cracking, shifting, or deteriorating prematurely. This guide explores the five best patio materials specifically suited for Chicago’s challenging climate, helping you make an informed decision for your outdoor living space. Understanding Chicago’s Weather Challenges for Patios Before diving into material options, it’s important to understand exactly what your patio will face throughout Chicago’s seasons: Freeze-Thaw Cycles: Chicago experiences frequent temperature fluctuations around freezing point, causing moisture to freeze and expand, then thaw repeatedly. This puts enormous stress on patio materials. Heavy Snow and Ice: Winter accumulation can exceed 35 inches annually, with snow often sitting on surfaces for weeks, causing moisture damage. Salt Exposure: De-icing products used in winter can corrode and deteriorate certain patio materials over time. Clay Soil: Chicago’s clay-heavy soil retains moisture and expands, potentially causing shifting and heaving beneath patios. Summer Heat: Temperatures can soar above 90°F in summer, causing certain materials to become uncomfortably hot or fade from UV exposure. With these challenges in mind, let’s explore the five best patio materials that have proven their resilience in Chicago’s demanding climate. Not Sure Which Patio Material Is Right For Your Home? Our Chicago patio experts can assess your specific yard conditions and recommend the perfect weather-resistant materials for your project. Schedule a Free Consultation 1. Concrete Pavers: Versatile and Freeze-Thaw Resistant Concrete pavers consistently rank as one of the best patio materials for Chicago weather due to their exceptional durability and versatility. These manufactured units come in countless shapes, colors, and textures, allowing for customized designs that complement any home style. Why Concrete Pavers Work Well in Chicago The secret to concrete pavers’ success in harsh climates lies in their installation method and physical properties. Unlike poured concrete, which forms a single slab prone to cracking, pavers create a flexible surface with joints that allow for slight movement during freeze-thaw cycles. Advantages Excellent freeze-thaw resistance when properly installed Individual units can be replaced if damaged Available in permeable options for better drainage Withstands heavy loads and traffic Typically less expensive than natural stone Disadvantages Requires periodic sealing for maximum protection Colors may fade over time without proper maintenance Quality varies significantly between manufacturers Proper installation is crucial for longevity Maintenance Requirements To keep concrete pavers performing well in Chicago’s climate, plan on these maintenance tasks: Seal every 2-3 years to prevent moisture absorption and salt damage Regularly clean with a mild detergent to prevent staining Replenish joint sand as needed, especially after winter Address any shifting pavers promptly to prevent further movement Pro Tip: For Chicago installations, choose concrete pavers with a minimum compressive strength of 8,000 psi and ensure a properly compacted base of at least 6-8 inches to prevent frost heaving. 2. Natural Stone: Timeless Beauty with Cold-Weather Durability Natural stone patios offer unmatched beauty and character that synthetic materials simply can’t replicate. For Chicago’s climate, certain types of natural stone perform exceptionally well, providing both aesthetic appeal and practical durability. Best Natural Stone Options for Chicago Not all natural stone is created equal when it comes to withstanding harsh weather. These varieties have proven most resilient in Chicago conditions: Granite: Extremely dense and hard, granite resists moisture absorption and stands up exceptionally well to freeze-thaw cycles. Its low porosity makes it highly resistant to salt damage. Bluestone: This dense sandstone has excellent compressive strength and low water absorption rates. Its natural cleft surface provides good traction in wet or icy conditions. Quartzite: With superior hardness and density, quartzite resists scratching and weathering, making it ideal for high-traffic areas in harsh climates. Advantages Exceptional longevity (50+ years with proper installation) Unique natural patterns and colors Increases property value Maintains temperature better than concrete (cooler in summer) Develops character over time Disadvantages Higher initial cost than manufactured materials Heavier and more difficult to install Some varieties may require more frequent sealing Limited color consistency between pieces Installation Considerations for Chicago Climate For natural stone to perform well in Chicago’s freeze-thaw environment, proper installation is critical: Use a minimum 6-8 inch compacted gravel base Install with polymeric sand joints that resist erosion Ensure proper slope for drainage (¼ inch per foot) Apply high-quality penetrating sealer specifically designed for freeze-thaw environments 3. Brick Pavers: Classic Appeal with Chicago-Tough Performance Brick pavers have adorned Chicago properties for generations, and for good reason. These clay-based units offer a timeless aesthetic that complements Chicago’s architectural heritage while providing excellent durability in our challenging climate. Why Brick Excels in Chicago Conditions Modern clay brick pavers are fired at extremely high temperatures, creating a dense material with low water absorption rates. This makes them particularly well-suited to withstand Chicago’s freeze-thaw cycles and moisture fluctuations. Advantages Exceptional longevity (100+ years in many cases) Colors remain vibrant without fading Flexible installation allows for ground movement Classic appearance complements Chicago architecture Good slip resistance in wet conditions Disadvantages Limited color and style options compared to concrete May develop moss or algae in shaded areas Requires proper drainage to prevent water accumulation Mid-range cost (more than concrete, less than premium stone) Maintenance Tips for Brick Patios in Chicago To keep your brick patio looking and performing its best through Chicago’s seasons: Sweep regularly to prevent debris accumulation Clean with a mild detergent and soft brush annually Reapply polymeric sand to joints every 2-3 years Monitor for shifting and address promptly Avoid harsh chemical de-icers that can damage clay Pro Tip: For Chicago installations, choose brick pavers rated for “severe weathering” (SW grade) with a water absorption rate below 5% to ensure maximum freeze-thaw resistance. Ready to Explore Patio Material Options? Our experts can help you compare samples and find

Scroll to Top